RLK1 Headlamp Relay Kit Installation Instructions
Click here to download the full guide with images
Before you get started, disconnect your battery.
Headlight relay kit includes: 12 volt relay, four wire plug connector with butt and ring connectors.
The reason for running a headlight relay in older vehicles is to remove the high amperage going thru your original headlight switch which can be the cause of dim headlights. The dash headlight switch will control the relay and the high amperage draw required by your headlights will be
switched within the relay itself. This is how modern automotive electrical systems are wired today.
We suggest mounting the relay under the dash and in between your headlight switch and floor dimmer switch. We suggest this location because wires
will be routing between both of these devices. The relay socket has a hole for easy mounting.
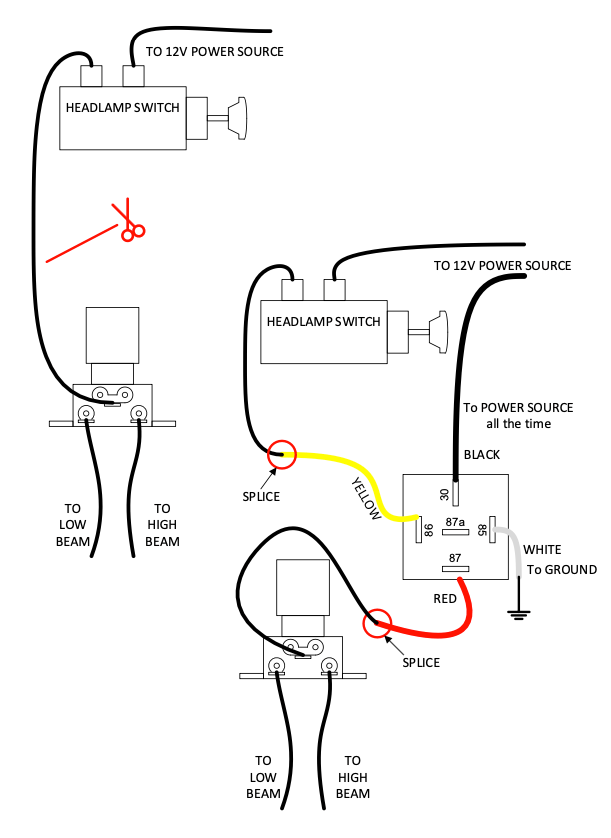
Look at the diagram. There are 4 wires that will be used. Start by first locating the wire going from the vehicle headlight switch to the dimmer switch. You may need a wiring diagram for your specific application. Simply cut this wire allowing enough wire to butt slice to the new relay wires. The piece of wire going to the dimmer switch will be spliced to the RED (87) wire from the relay. The piece of wire going to the headlight switch will be spliced to the YELLOW (86) wire. The BLACK (30) wire requires a constant 12v power source. This can be from the ignition switch or
a fuse panel, either will have a terminal with constant power. The WHITE (85) wire should be wired to a good ground.
Once the wiring is completed, reconnect your battery and test to see the headlights operate with your switch and dimmer.

