Ford G3 Alternator Connection Plug Installation Instructions
Click here to download the full guide with images
1. Before you get started always disconnect your battery.
2. Locate the voltage regulator, usually on the firewall. Remove the ARM and FLD wires and tape them back with electrical tape in case you or the next guy want to re-install a generator. These wires connect to the generator and you don’t need them.
3. Remove the two wires from the generator and tape them back. These leads go to the old voltage regulator and you will not need them.
4. Remove the old generator and bracket and install the new bracket provided along with the new alternator using the hardware included in the kit. Use proper torque settings for the hardware. It is a good idea to use threadlocker to prevent the hardware from coming loose. Note: The alternator has a built in regulator and does not require any external voltage regulation.
5. Reinstall the belt and tighten so that there is about 1” to 1- 1/2” belt deflection. There is no need to over tighten your belt or you will put extra stress on the water pump and alternator bearings. Note: You may need to buy a longer or shorter belt as the alternator set up may be different.
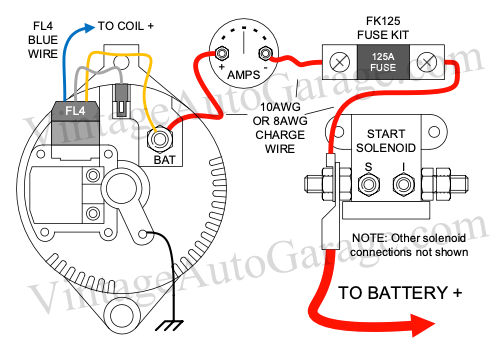
6. Snap in the FL4 plug and connect the blue wire to the + side of the coil along with the wire that was already connected there. If you are using a coil with external ballast resistor connect this wire to the battery side or key switch side of the resistor or directly to the key switch itself (switched side). This wiring configuration will excite the alternator to start charging when the engine is running at low RPM’s.
7. Plug the white FL4 wire into the STATOR connection on FL4 the alternator.
8. Connect the 10AWG or 8AWG charge wire and yellow FL4 wire to the alternator BAT stud. Route the charge wire to your amp gauge if you have one and cut it to length. Connect the ammeter in the charge wire circuit using the #10 ring terminals included with the charge wire kit. Do the same to include the Fuse Kit FK125 in the charge wire circuit. Complete the charge wire by routing it to the + side of the battery, or anywhere that leads direct to the + side of the battery like the starter solenoid. The ammeter reads current flow, works on 6 or 12 volts, and no reducer is needed for the ammeter. If the meter is connected backwards, it will read negative when the alternator is charging. If this happens, reverse the wires on the back of the gauge.
9. Note: the alternator charge wire routes only through the ammeter and fuse, and not through any switch connection. Note: the wiring that comes with our kits should be used as it is sized to handle the amperage.
10. Reconnect the battery and make sure it is fully charged using a battery charger. You want to have a fully charged battery when doing the next steps. Note: An alternator will not charge a dead battery because alternators take current to excite the field coil to make everything work.
11. Make sure the battery is connected negative to ground and the positive to the starter or starter solenoid. This is important as the alternator is designed for negative ground and the alternator regulator may be damaged if it is wired as positive ground.
12. Start engine and test alternator. While engine is at idle, take a screwdriver or pocket knife and place on the back of the alternator bearing surface, (the round area in the middle of the back of alternator). Your alternator is working when you can feel a magnetic pull on the knife or screwdriver. You can also check the amp / volt meter by turning on the headlightsandwatchingformovement. Ifyoudonothave magnetic pull on the back of alternator, you may have a loose connection. Always check your grounds. The alternator is internally regulated and self-exciting, which means it will turn on and off when sensing the rotation of the rotor. The regulator is pre-set at 14.5 volts, on a 12 volt alternator and 8 volts on a 6 volt alternator and will maintain the battery and accessories on the vehicle. Because all meters are calibrated differently you may see a +/- 0.2v difference.

Special note regarding ignition coils: When installing your coil in a negative grounded system the positive (+) should go to the key or ignition switch and the negative (-) goes to the distributor. This is important as the coil will not put out full voltage or spark if wired backward. This is very important when converting from positive grounds to negative grounded vehicles.
CAUTION: Working around rotating belts and pulleys can be very dangerous and can catch hair, clothing, and fingers.
CAUTION: Working around electrical systems can be dangerous even though the battery voltage is low, the current is high and you can get injured. The voltage from an ignition coil is over 20,000 volts! Always! Always disconnect your battery when doing any repairs to the electrical system.
Be safe and enjoy your new electrical system.

Connections shown are typical. Your installation may differ depending on components in your system, such as with a foot pedal starter system without start button, or switched ground control of starter solenoid.
